






Register private nameservers for your domain
Create nameservers such as ns1.example.com for a HyperDC domain: register them with their IP addresses as glue records, change or delete them, then use them.
- Intermediate
- 8 min read
- Updated
Tested on: HyperDC client area
This guide is not available in your language yet, so it is shown in English.
On this page
Private nameservers carry your own domain name, such as ns1.example.com and ns2.example.com, instead of the name of a DNS provider. They are useful when you run your own DNS server, for example on a VPS, or when you offer hosting to your own customers. Because these names live inside the domain they serve, the registry needs their IP addresses: the client area registers those addresses as glue records. This guide shows how to register, change and delete private nameservers and how to use them.
Before you start
- A DNS server that answers for your zones. It must run on a fixed IP address and serve every domain you will point to it, for example BIND, PowerDNS or the DNS of a control panel on your server. Its firewall must allow port 53 over UDP and TCP.
- Two addresses, ideally. Register at least two nameservers, preferably on different IP addresses or servers.
- The domain is registered with us and Active. The tool works on the domain whose name the nameservers carry, for example
example.comforns1.example.com. - The extension supports it. You see Private Nameservers under What would you like to do today? on the domain page.
Step 1: Open Private Nameservers
Go to Domains › My Domains, open the domain and select Private Nameservers. The page explains: "From here you can create and manage custom nameservers for your domain (eg. NS1.example.com, NS2.example.com...)." Manage Domain takes you back.
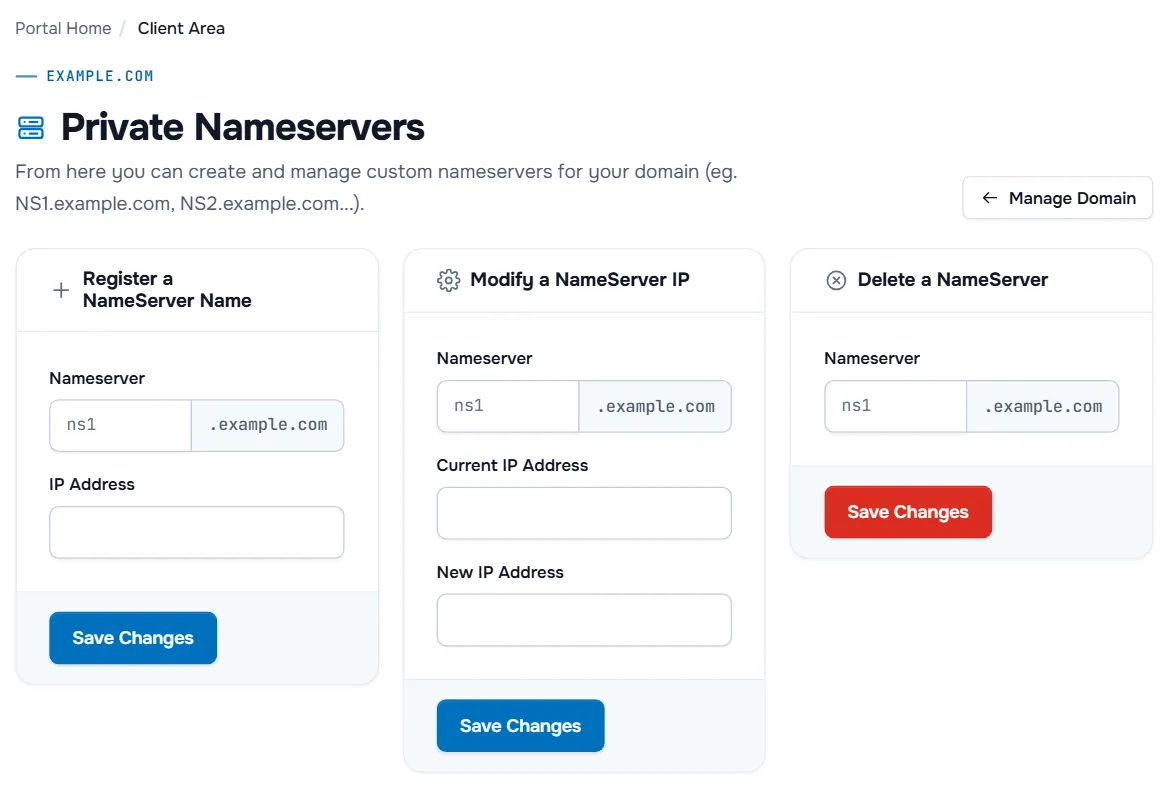
The page has three cards, each with its own Save Changes button: Register a NameServer Name, Modify a NameServer IP and Delete a NameServer.
Step 2: Register a nameserver
- In Register a NameServer Name, enter the first part of the name in Nameserver, for example
ns1. Your domain is added automatically, as the field shows (.example.com). - Enter the server's address in IP Address, for example
203.0.113.24. - Select Save Changes.
- Repeat for
ns2with the address of your second server.
The result of each request appears at the top of the page. If the registry refuses it, the message says why, for example an invalid address or a name that already exists.
Step 3: Point your domains to the new nameservers
Once your DNS server holds the zone of each domain:
- Open the domain that should use them, on this domain or any other.
- In the Nameservers tab, choose Use custom nameservers (enter below).
- Enter
ns1.example.comin Nameserver 1 andns2.example.comin Nameserver 2, then select Change Nameservers.
See change domain nameservers for the details and the time the change takes.
Verify: each name resolves to the address you registered, and your server answers for the zone:
Linux and macOS
dig +short ns1.example.com
dig example.com SOA @ns1.example.com +short
Windows
Resolve-DnsName ns1.example.com -Type A
Resolve-DnsName example.com -Type SOA -Server ns1.example.com
For .com and .net domains, you can also ask the registry's servers directly: dig NS example.com @a.gtld-servers.net +norecurse lists the delegation, and once the domain uses its own nameservers, the ADDITIONAL SECTION shows their glue addresses.
Change or delete a nameserver
Change the IP address, for example when you move the DNS server:
- Make sure the DNS server already answers on the new address.
- In Modify a NameServer IP, enter the name in Nameserver (for example
ns1), the Current IP Address and the New IP Address. - Select Save Changes. Keep the old server answering for a while, because the old address stays cached.
Delete a nameserver you no longer use:
- First move every domain that still uses it to other nameservers. The registry may refuse to delete a nameserver that domains still use.
- In Delete a NameServer, enter the name in Nameserver and select the red Save Changes, then confirm.
Troubleshooting
The registration is refused. Check the address format and that the name is not registered already; use Modify a NameServer IP to change an existing one. Some extensions do not support private nameservers.
Domains stop resolving after the switch. The DNS server does not answer for the zone, or port 53 is blocked. Query it directly with dig example.com SOA @203.0.113.24 and check the firewall, for example with UFW. See DNS not resolving.
The nameserver change is rejected. Register the private nameservers first, then use them as custom nameservers.
Next steps
- Learn how delegation works: DNS basics for a new domain.
- Switch your domains to them: change domain nameservers.
- Back to the domain overview: manage your domain.
Frequently asked questions
What are private nameservers?
Nameservers named under your own domain, such as ns1.example.com and ns2.example.com. Because they live inside the domain they serve, the registry needs their IP addresses, known as glue records.
Do I need my own DNS server for this?
Yes. Registering the names only tells the registry where they are. A DNS server must run on those IP addresses and answer for every domain you point to them, for example on your server or in a control panel with DNS.
How many private nameservers should I register?
At least two, ideally on different IP addresses, so the domain keeps resolving if one server is unavailable.
Can I use private nameservers for other domains?
Yes. Once registered, ns1.example.com and ns2.example.com can serve any domain, also at other registrars. Enter them as custom nameservers on each domain.
Why does the old IP address still answer after I changed it?
Resolvers and the registry's delegation keep the old address cached for a while. Keep the old server answering until the new address shows up in your checks.