






Your servicesUpgrades & add-ons
Upgrade or downgrade a service
Move your VPS, VDS or hosting plan to a bigger or smaller package, change single options, understand the prorated amount and grow the disk inside the server.
- Intermediate
- 12 min read
- Updated
Tested on: HyperDC client area, Ubuntu 24.04 LTS, Ubuntu 26.04 LTS, Debian 12, Debian 13, Windows Server 2022, Windows Server 2025
This guide is not available in your language yet, so it is shown in English.
On this page
- Before you start
- Step 1: Start the change on the service page
- Step 2: Choose a new plan
- Step 3: Change single options (if your service offers them)
- Step 4: Review the summary and pay
- Step 5: Restart and check the resources
- Step 6: Use the new disk space
- Moving to a smaller disk
- Add-ons for your service
- Troubleshooting
- Next steps
When your project outgrows its plan, you can move it to a bigger package from the client area; when it needs less, to a smaller one. You can also change single options, such as additional IP addresses or disk space, where your plan offers them. This guide explains the steps, how the price is calculated and what to do inside the server after a disk upgrade.
Before you start
- Measure first. Make sure the plan is really the limit; see high CPU or memory usage and VPS vs VDS vs dedicated server.
- Pay open invoices. An unpaid renewal invoice for the service blocks upgrades.
- Take a backup of important data before larger changes. Windows VPS plans include free snapshots; take one if your plan offers them.
- Know the limits. Disks cannot be made smaller. Moving between product lines (VPS to VDS, VDS to dedicated) is not an upgrade but a move to a new server.
- Invited users need the permission Place New Orders/Upgrades/Cancellations from the account owner.
Step 1: Start the change on the service page
Go to Services › My Services and select Manage next to the service. Then open the Actions menu:
- Upgrade/Downgrade moves the service to another plan of the same line.
- Upgrade/Downgrade Options changes single options of your current plan.
The Upgrade buttons in the Upgrade/Downgrade card and next to Configurable Options on the Overview tab lead to the same pages. Which entries appear depends on the product; see manage your services.
Step 2: Choose a new plan
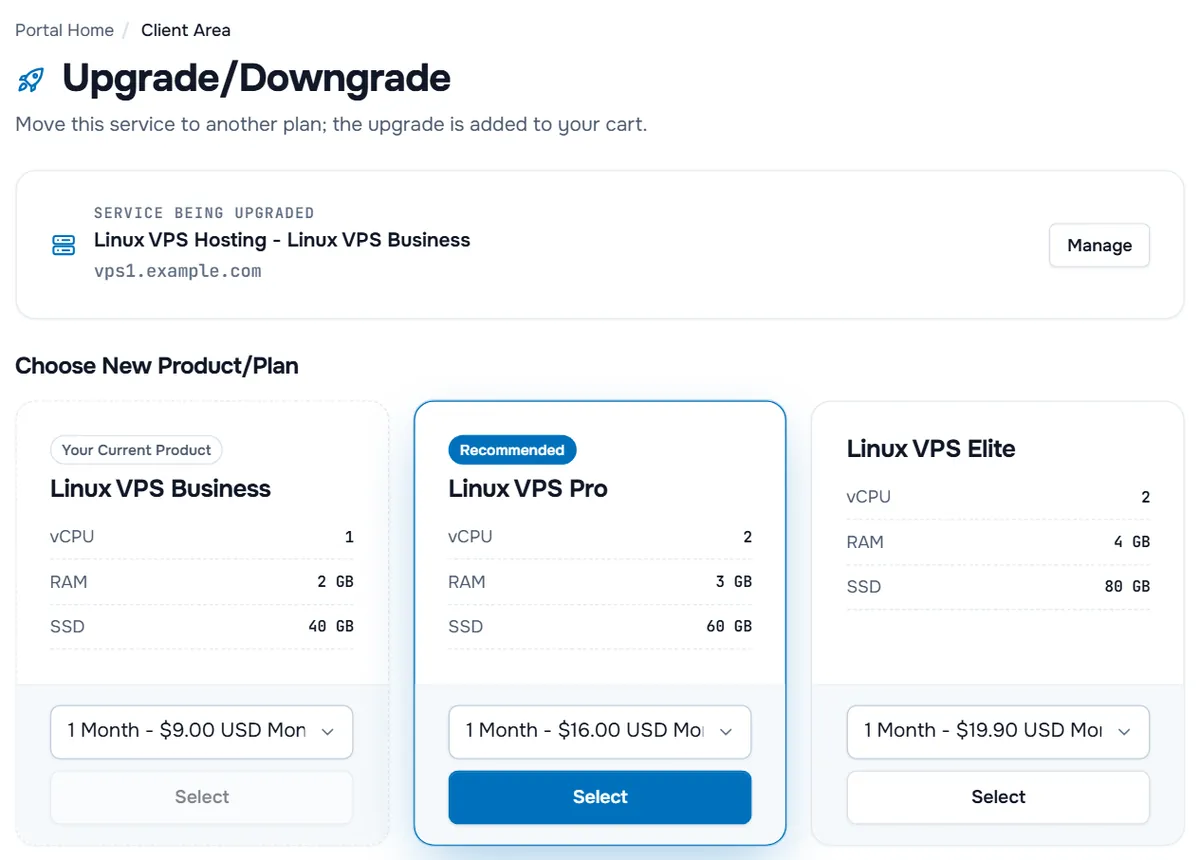
- Service being upgraded at the top shows which service you are changing; Manage takes you back to it.
- Under Choose New Product/Plan, each card shows a plan with its main resources. Your Current Product marks the plan you have now, and Recommended highlights the plan we suggest as the next step.
- Choose the billing cycle in the menu of the plan you want, then select Select. The upgrade is added to your cart; check it and continue to checkout as for any order. See review your cart and checkout step by step.
For some products the plan page is a simpler list of packages with Choose Product buttons. Choosing one opens the summary described in Step 4.
Verify: your cart, or the summary, shows the change from your current plan to the new one.
Step 3: Change single options (if your service offers them)
Upgrade/Downgrade Options opens a table of the options you can change, such as additional IPv4 addresses, additional disk space or snapshots, if your service offers them.
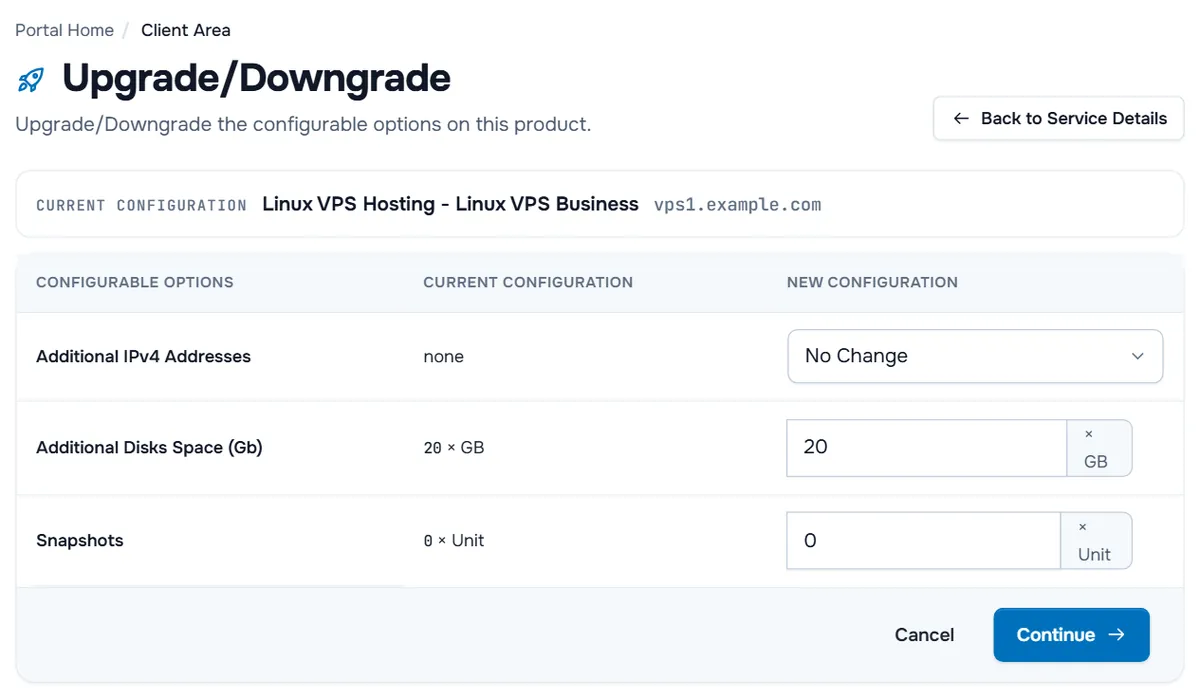
- Current Configuration shows what you have now; New Configuration is where you choose the new value.
- Menus start on No Change. Quantity options, such as gigabytes or units, take a number.
- Select Continue to see the price, or Cancel to go back without changes.
Step 4: Review the summary and pay
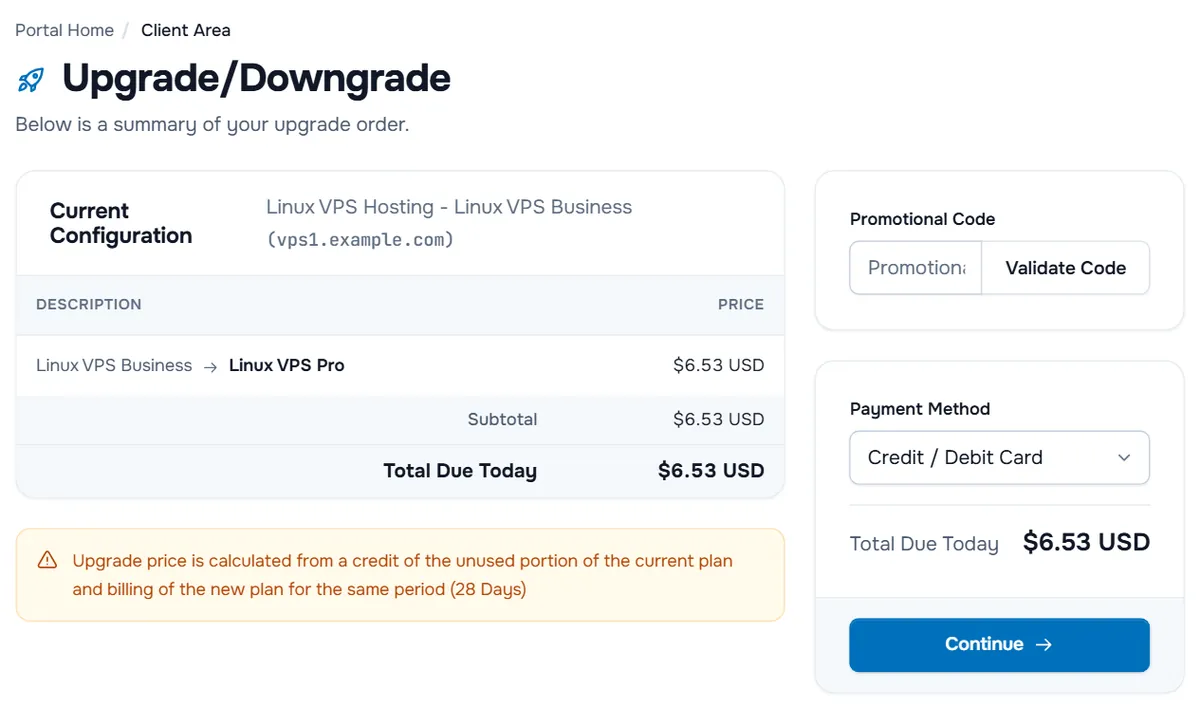
- The table lists each change (old value → new value) with its Price, the Subtotal, taxes if they apply, and Total Due Today.
- The note explains the calculation: "Upgrade price is calculated from a credit of the unused portion of the current plan and billing of the new plan for the same period", followed by the number of days left in the term.
- If you have a promotional code, enter it under Promotional Code and select Validate Code.
- Choose the Payment Method from the methods available for your account, then select Continue.
An invoice for the difference is created. Pay it as usual; see pay an invoice. You never pay twice for the same days, and your Next Due Date does not change. For a downgrade, check the amount on the summary before you continue.
Verify: after payment the service page shows the new plan name or options. Most changes are applied automatically; some are carried out by our team, which can take a little longer.
Step 5: Restart and check the resources
Virtual servers usually need a restart before the new CPU or memory become visible. Restart from inside the server at a quiet moment:
sudo rebootThen check the resources:
nproc
free -h
lsblk
Verify: nproc shows the new number of CPUs, free -h the new memory and lsblk the new disk size.
Step 6: Use the new disk space
A larger disk does not always mean a larger file system: the partition and the file system on it may still have the old size. Compare lsblk (disk size) with df -h / (file system size).
Linux ext4
Grow the partition with growpart from the cloud-guest-utils package, then the file system:
sudo apt install cloud-guest-utils
sudo growpart /dev/vda 1
sudo resize2fs /dev/vda1
Linux XFS
Grow the partition, then the mounted XFS file system by its mount point:
sudo growpart /dev/vda 1
sudo xfs_growfs /
Linux LVM
Grow the partition, the physical volume, then the logical volume together with its file system (-r):
sudo growpart /dev/vda 3
sudo pvresize /dev/vda3
sudo lvextend -r -l +100%FREE /dev/mapper/ubuntu--vg-ubuntu--lv
Windows Server
Extend drive C: to the largest size the disk allows, in PowerShell as administrator:
$size = Get-PartitionSupportedSize -DriveLetter C
Resize-Partition -DriveLetter C -Size $size.SizeMax
Find your file system type with df -T /. Verify: df -h / (or Get-Volume on Windows) now shows the larger size.
Moving to a smaller disk
Disks cannot be shrunk. To use a plan with a smaller disk:
- Back up your data and configuration; see backup strategy.
- Order the smaller plan as a new service.
- Restore your data there and test it.
- Point your domain to the new server and cancel the old one.
Add-ons for your service
If add-ons are offered for your service, the Addons tab of the service page lists the ones you have, and a note says "Addons are available for your product/service" with a link to order more. You can also open Services › View Available Addons. On the page Product Addons, each add-on shows its price; choose the service under Add to service and select Order Now. The add-on then goes through the cart and checkout like any order. If no add-ons are offered, the page says so.
Troubleshooting
The Upgrade/Downgrade entries are missing. The product has no other plan to move to within its line, or its options cannot be changed. To move to another product line, order the new server and move your data, as described in the FAQ of this guide.
"You cannot currently upgrade or downgrade this product because an invoice has already been generated for the next renewal." Pay the renewal invoice first, then try again.
The page says an upgrade or downgrade is already in progress. An earlier change is waiting for payment. Pay its invoice under Billing › My Invoices, or open a ticket if you no longer want it.
The new memory or CPUs do not show. Restart the server from inside the operating system. If they still do not appear, open a ticket with the output of nproc and free -h.
growpart reports NOCHANGE. The partition already fills the disk, or the disk has not grown yet. Check lsblk after a restart.
Next steps
- Keep an eye on usage: high CPU or memory usage and disk full.
- Compare lines before a bigger move: VPS vs VDS vs dedicated server.
- See everything on the service page: manage your services.
Frequently asked questions
How is an upgrade billed?
You pay only the difference for the rest of the current billing period: the unused part of your current plan is credited and the new plan is charged for the same period. The summary shows the number of days this covers, and your next due date stays the same.
Will my server restart during an upgrade?
Changing CPU, memory or disk of a virtual server usually needs a restart to take effect. Plan the upgrade for a quiet moment and make sure your services start automatically after a reboot.
Can I make the disk smaller?
No. Disks cannot be made smaller. To move to a plan with a smaller disk, back up your data, order the smaller plan, restore the data there and cancel the old service.
Why can I not upgrade right now?
An unpaid renewal invoice or an upgrade that is still waiting for payment blocks new changes. Pay the open invoice first, then the upgrade is available again. Some products also have no other plan to move to within their line.
Can I use a promotional code for an upgrade?
If you have one, enter it under Promotional Code on the upgrade summary and select Validate Code. Codes can be limited to certain products or cycles, so not every code applies to an upgrade.
How do I move from a VPS to a VDS or a dedicated server?
Moving between lines means a new server and a migration of your data, because they run on different platforms. Order the new server, move your data, test, then cancel the old service.