






Add an additional IPv4 address to a Linux server
Bring an extra IPv4 address up on Ubuntu, Debian, AlmaLinux or Rocky Linux: test it with ip, then make it permanent with netplan, ifupdown or NetworkManager.
- Intermediate
- 15 min read
- Updated
On this page
Additional IPv4 addresses are useful for separate TLS endpoints of older clients, a mail server with its own reputation, or services that must listen on their own address. After you order them, the addresses are routed to your server, but Linux uses them only once you add them to the network interface. This guide does that safely: first at runtime, then permanently.
Before you start
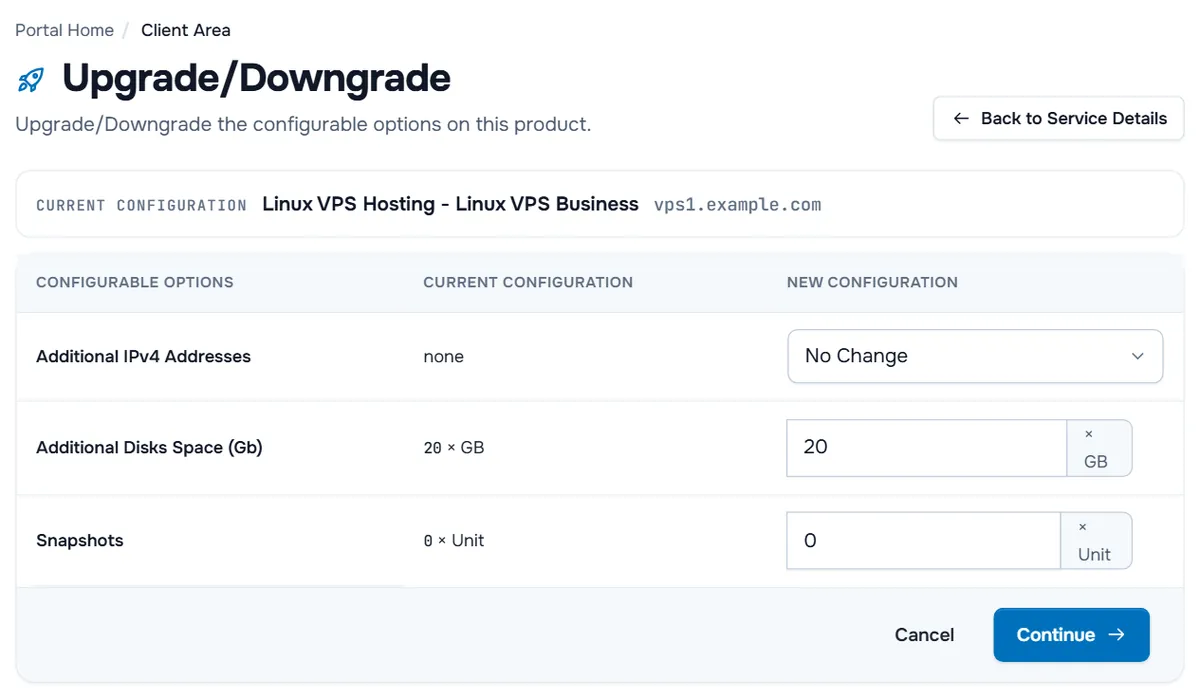
- Order the addresses. For an existing server: Services › My Services, Manage next to the server, then Actions › Upgrade/Downgrade Options and the Additional IPv4 Addresses option, where your plan offers it; see upgrade or downgrade a service.
- Note the details. The new addresses are listed with your service (on the service page and in the email we send). You need each address and its prefix length (for example
/24), plus the gateway if a different one is given. - Have a way back. A wrong network change can cut your SSH session. Know how to reach the server's console (see locked out after a firewall change) and keep a second SSH session open while you work.
In the examples, the primary address is 203.0.113.10/24 with the gateway 203.0.113.1, the new address is 203.0.113.11/24, and the interface is eth0.
Step 1: Find the interface and the current configuration
ip -brief address
ip route show default
The interface that holds your primary address and the default route is the one you extend (often eth0, ens3 or enp1s0). Then see which tool manages the network:
ls /etc/netplan/ /etc/network/interfaces /etc/NetworkManager/system-connections/ 2>/dev/null- Files in
/etc/netplan/: netplan (Ubuntu, and some Debian images). - A configured
/etc/network/interfaces: ifupdown (classic Debian). - NetworkManager connections: AlmaLinux and Rocky Linux; confirm with
nmcli connection show.
Step 2: Test the address at runtime
Add the address for the running system only. It disappears at the next reboot, so a mistake cannot lock you out for long:
sudo ip address add 203.0.113.11/24 dev eth0
ip -brief address show dev eth0
From your own computer, check that the new address answers:
ping -c 3 203.0.113.11Verify: the ping gets replies. If it does not, remove the test address with sudo ip address del 203.0.113.11/24 dev eth0 and compare the details with the ones we sent before going further.
Step 3: Make it permanent
netplan
Open the YAML file in /etc/netplan/ that defines your interface (for example sudo nano /etc/netplan/50-cloud-init.yaml) and list the new address under addresses, in CIDR notation:
network:
  version: 2
  ethernets:
    eth0:
      addresses:
        - 203.0.113.10/24
        - 203.0.113.11/24
      routes:
        - to: default
          via: 203.0.113.1
      nameservers:
        addresses: [1.1.1.1, 9.9.9.9]
Keep the rest of your file as it is: only add the line. If your file uses dhcp4: true instead of addresses, add an addresses: list with only the new address under the same interface. Then apply with an automatic rollback:
sudo netplan trynetplan try applies the change and rolls it back after 120 seconds unless you confirm it. Confirm only when your SSH session still works.
ifupdown
Add a second iface stanza for the same interface to /etc/network/interfaces (sudo nano /etc/network/interfaces), below the existing one. The second stanza has no gateway:
iface eth0 inet static
    address 203.0.113.11/24
The address from Step 2 is already active. The file makes it permanent from the next boot; reboot when it suits you and check again.
NetworkManager
Find the connection name, add the address to it with the + prefix and reactivate the connection:
nmcli connection show
sudo nmcli connection modify "System eth0" +ipv4.addresses 203.0.113.11/24
sudo nmcli connection up "System eth0"
Use the name nmcli connection show printed (here System eth0). Reactivating the connection interrupts the network for a moment.
Verify: after a reboot, ip -brief address lists both addresses and ping -c 3 203.0.113.11 from your computer still gets replies.
Step 4: Use the address
- Open the firewall for the services that listen on it. UFW and nftables rules that do not name an address apply to all addresses; see UFW firewall.
- Bind services to it where needed, for example
listen 203.0.113.11:443 ssl;in an Nginx server block, or theinet_interfacesandsmtp_bind_addresssettings of Postfix. - Reverse DNS: give the address its own PTR record if a mail server sends from it; see reverse DNS (PTR).
Troubleshooting
netplan try warns Permissions for /etc/netplan/… are too open. netplan files can contain secrets and should be readable by root only: run sudo chmod 600 /etc/netplan/*.yaml.
Error in network definition from netplan. YAML is indentation-sensitive. Use spaces, not tabs, and keep the - entries of addresses aligned. sudo netplan generate shows the line it cannot read.
The address answers from the server but not from outside. The address is not routed to this server yet, or a firewall drops it. Check the details we sent, then the firewall; if both look right, open a ticket with the output of ip -brief address.
SSH dropped and the server is unreachable after the change. Wait for the netplan try rollback (120 seconds). Otherwise use the console to undo the change, as described in locked out after a firewall change.
Outgoing mail still leaves from the primary address. That is the default. Set the sending address in the mail server (for Postfix, smtp_bind_address) and make sure its PTR record matches.
Next steps
- Add IPv6 as well: IPv6 setup.
- On Windows servers: add an additional IPv4 address on Windows Server.
Frequently asked questions
Where do I order more IPv4 addresses?
In the order form of a new server, or for an existing one under Actions › Upgrade/Downgrade Options on its service page, where your plan offers the Additional IPv4 Addresses option. If you need a larger block, tell us in a ticket what you will use it for.
Which address does the server use for outgoing connections?
The primary address, as before. An added address answers incoming traffic and can be used for outgoing traffic when an application binds to it, for example a mail server with its own sending address.
Can I give the new address its own reverse DNS name?
Yes. Every IPv4 address has its own PTR record. See our reverse DNS guide for how to request it.
Do I need a second gateway?
Normally not: additional addresses in the same network use the gateway you already have. If the details we sent list a different gateway or a /32 address, follow those details or ask us in a ticket before you change the default route.