






Change the nameservers of your domain
Point a HyperDC domain to your hosting plan, Cloudflare or your own DNS: choose default or custom nameservers, save the change and verify it with dig.
- Beginner
- 6 min read
- Updated
Tested on: HyperDC client area
This guide is not available in your language yet, so it is shown in English.
On this page
Nameservers decide which DNS servers answer for your domain, and so where its website and email live. Change them when you move the DNS of a domain to your hosting plan, to Cloudflare or to your own servers. This guide shows how to switch them on the domain page, how long the change takes and how to check it.
Before you start
- Get the new nameservers. They come from your hosting welcome email, your DNS provider (for example Cloudflare) or your own private nameservers.
- Prepare the zone first. The new DNS host must already hold every record you need: the website (
@andwww), MX, SPF, DKIM, DMARC and any verification records. Compare with what resolves today:
dig example.com A +short
dig example.com MX +short
dig example.com TXT +short- DNSSEC. If the domain is signed with DNSSEC at the old DNS host, open a ticket before you switch so the DS record can be removed or replaced. A leftover DS record makes the domain fail for validating resolvers.
Default or custom nameservers
The Nameservers tab offers two choices:
- Use default nameservers returns the domain to the nameservers of our domain service, which new domains use unless you enter others. Choose it when you manage the records with DNS Management (where it is available for your domain) or want to undo a change.
- Use custom nameservers (enter below) sends the domain to any other DNS host: your hosting plan, Cloudflare, a DNS provider or your own servers.
Step 1: Open the Nameservers tab
Go to Domains › My Domains, open the domain and select the Nameservers tab. You can also use Change the nameservers your domain points to under What would you like to do today?.
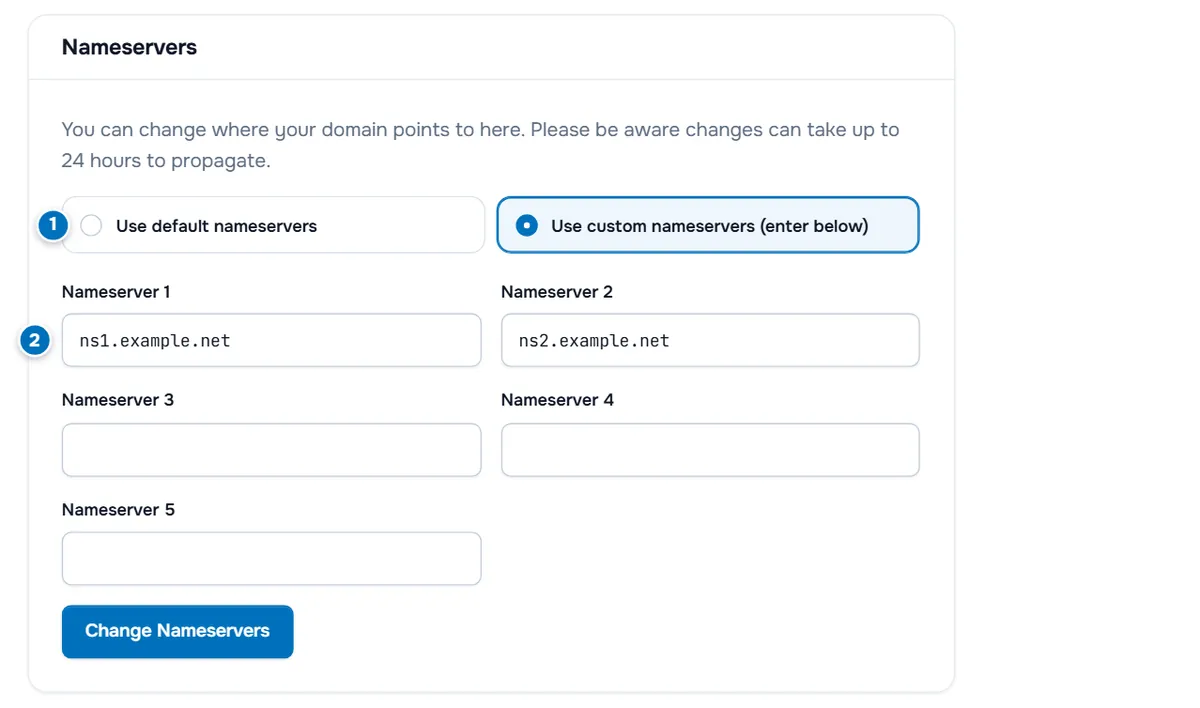
- Use default nameservers or Use custom nameservers (enter below).
- Nameserver 1 to Nameserver 5, the fields for custom nameservers.
Step 2: Enter the nameservers and save
- Choose Use custom nameservers (enter below).
- Enter the first nameserver in Nameserver 1 and the second in Nameserver 2, for example
ns1.example.netandns2.example.net. Enter host names only, withouthttp://or a trailing slash. - Fill Nameserver 3 to Nameserver 5 only if your DNS host gives you more; leave the other fields empty.
- Select Change Nameservers.
Verify: the tab shows Changes Saved Successfully!. If an error appears instead, check the spelling of each nameserver.
Step 3: Wait for the change to spread
The tab says: "Please be aware changes can take up to 24 hours to propagate." Even after the registry has the new nameservers, resolvers that cached the old ones keep using them until their cache expires. During that time, some visitors still reach the old DNS host, which is why both hosts should hold the same records while you switch.
Step 4: Verify the change
Check the delegation from your computer:
Linux and macOS
dig NS example.com +short
dig +trace example.com
Windows
Resolve-DnsName example.com -Type NS
Resolve-DnsName example.com -Type NS -Server 1.1.1.1
Verify: the answer lists the new nameservers. The last part of dig +trace shows the nameservers the registry delegates to and the records they return. Then check that the website and mail records resolve as expected at the new DNS host.
Change the nameservers of several domains
To give many domains the same nameservers, select them in Domains › My Domains and choose Manage Nameservers under With Selected. See bulk domain management.
Troubleshooting
The change is rejected. The nameservers must exist and answer for your domain. Check their spelling. Nameservers under your own domain, such as ns1.example.com, must be registered first, see private nameservers.
The domain stopped working after the change. The new DNS host does not hold the records yet. Add the A, AAAA, MX and TXT records there, or switch back to the previous nameservers while you prepare them. See DNS not resolving.
The old nameservers still show after a day. Query a public resolver such as 1.1.1.1 and check dig +trace. If the registry still delegates to the old nameservers, open a ticket with the domain name.
There is no Nameservers tab. The domain is not Active yet, or the extension does not allow changes here. Check the status on the domain page or open a ticket.
Next steps
- Connect the domain to your server: point a domain to your server.
- Put Cloudflare in front of your site: Cloudflare setup.
- Back to the domain overview: manage your domain.
Frequently asked questions
How long does a nameserver change take?
The Nameservers tab notes that changes can take up to 24 hours to propagate. Resolvers that cached the old nameservers keep them until their cache expires; many visitors see the change sooner.
How many nameservers do I need?
Enter at least two, in Nameserver 1 and Nameserver 2. Use the fields up to Nameserver 5 only if your DNS host gives you more.
Do my DNS records move with the nameservers?
No. The records stay at the old DNS host. Create every record you need at the new DNS host before you switch, or the website and email stop working.
What are the default nameservers?
The nameservers of our domain service, which new domains use unless you enter others. Choose Use default nameservers to return to them, for example to use DNS Management where it is available for your domain.
Where do I get the nameservers for my hosting plan?
From the welcome email of the plan. With those nameservers, the control panel of the plan manages all records of the domain, including email.