






Account & securityUsers & permissions
Accept an invite and switch between client accounts
Accept an invitation to someone's HyperDC client account with your login or a new one, then switch between all client accounts you can open with one sign-in.
- Beginner
- 4 min read
- Updated
Tested on: HyperDC client area
This guide is not available in your language yet, so it is shown in English.
On this page
At HyperDC, a user login and a client account are separate. A freelancer or agency can manage several customers' accounts with one login, and a company can let several employees work in one account. This guide shows how to accept an invite, choose an account after signing in and switch between accounts later.
Before you start
- To join a client account, you need an invite. The owner of that account sends it from User Management, see users and permissions.
- If you already have a login with us, decide whether to accept with it. Accepting with your existing login keeps everything under one email address and password.
Step 1: Accept the invite
Open the link in the invitation email. The page says "You have been invited to" followed by the account's name, and who gave you access.
- Already signed in: "To accept the invite, simply click the button below." Select Accept Invite.
- Not signed in: "To accept the invite, please login or register below."
- Login — enter the Email Address and Password of your existing login and select Login.
- Register — enter First Name, Last Name, Email Address and a Password (Generate creates one; the strength bar rates it), tick the terms of service box and select Register.
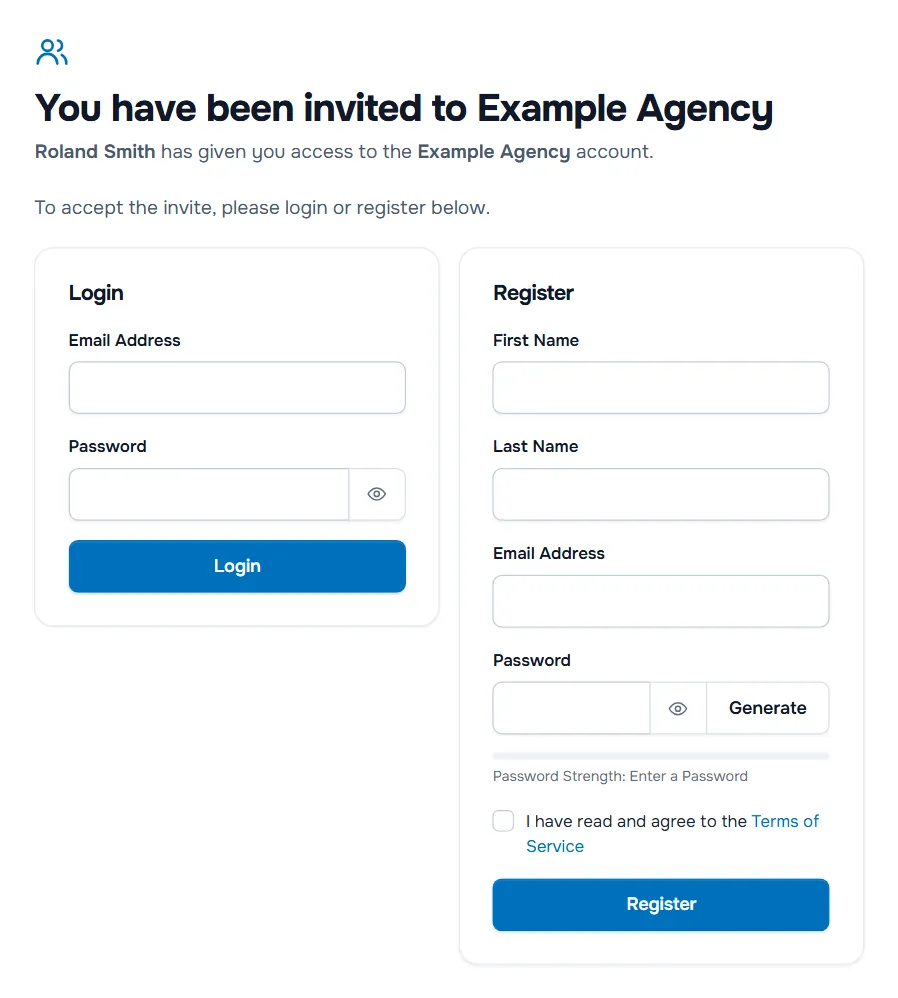
Verify: "Account invite accepted!" appears, and the account is listed when you choose or switch accounts.
If the page says "Sorry, we couldn't find a pending invite matching your request.", the invite was cancelled or already used. "Please contact the account administrator to request a new invite."
Step 2: Choose the account to work in
When your login can open more than one client account, the Choose Account page lists them: "Choose account to login and manage". Select the account you want.
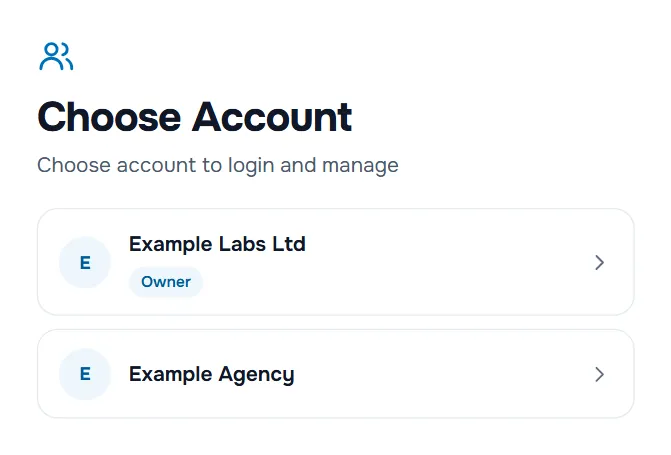
- Owner marks accounts you own. The others were shared with you, with the permissions their owner chose.
- A closed account is shown greyed out and cannot be opened.
Verify: the dashboard of the chosen account opens.
Step 3: Switch to another account later
Open the account menu (your name at the top right) and select Switch Account. The Choose Account page opens again; select the other account.
If you follow a link that belongs to another of your accounts, for example in an invoice email, a page explains: "The URL you have attempted to access requires you to be logged in as a different client." Select Continue to switch to that account, or Cancel and return to homepage to stay where you are.
Step 4: Check which account you are working in
The name at the top right shows the active client account: its company name, or the account holder's name when there is no company. Check it before you:
- order, upgrade or cancel a service,
- pay an invoice,
- change Account Details or contacts,
- open a support ticket.
When you order while signed in, checkout asks under Choose Account which client account the order is for. Accounts where you may not order show No Permission, and Create a New Account opens a new client account of your own.
What belongs to your login and what to the account
| Your login (every account) | Each client account |
|---|---|
| Your Profile: your name and sign-in email address | Account Details: invoice name, company and address |
| Password and security question | Services, domains, invoices and tickets |
| Two-factor authentication | Contacts and email preferences |
| The permissions you have in it |
Troubleshooting
"No accounts found." Your login is not linked to any client account yet. "To create a new account, you will need to place a new order." Select Shop Now, or ask the account owner to invite you again.
A shared account is missing from Choose Account. The owner removed your access or the invite was sent to another email address. Ask the owner to check User Management.
I cannot see invoices or services in a shared account. Your permissions in that account do not include them. Ask its owner to change them with Manage Permissions.
I accepted the invite with the wrong login. Ask the owner to remove that login's access and invite the right email address.
Next steps
Frequently asked questions
Do I need a separate login for each client account?
No. One login with one email address and password can open every client account you were invited to. You choose the account after signing in or switch later.
If I register on the invite page, do I get my own client account?
No. Registering there creates a login that opens the account you were invited to. For a client account of your own, place an order and choose Create a New Account under Choose Account at checkout.
Do my password and two-factor authentication apply to every account?
Yes. They belong to your login. What you may do inside each client account depends on the permissions that account's owner gave you.
How do I leave a client account?
Ask the owner of that account to select Remove Access for your login under User Management. Your login keeps working for your other accounts.