






Account & securityUsers & permissions
Users and permissions: give your team access
Invite colleagues to your HyperDC client account with their own login, choose exactly what each user may see and do, and remove access when someone leaves.
- Beginner
- 6 min read
- Updated
Tested on: HyperDC client area
This guide is not available in your language yet, so it is shown in English.
On this page
A client account can be used by several people without sharing a password. Each user signs in with their own email address and password and gets only the permissions you choose. This guide invites a user, explains every permission and shows how to change or remove access.
Before you start
- Sign in with the account owner's login. Users without full permissions may not be able to manage other users.
- Have the email address the person will sign in with. If they already have a login with us, use that address.
Step 1: Open User Management
Open the account menu (your name at the top right) and select User Management. The page shows how many users were found and lists each one with Email Address, Last Login and Actions.
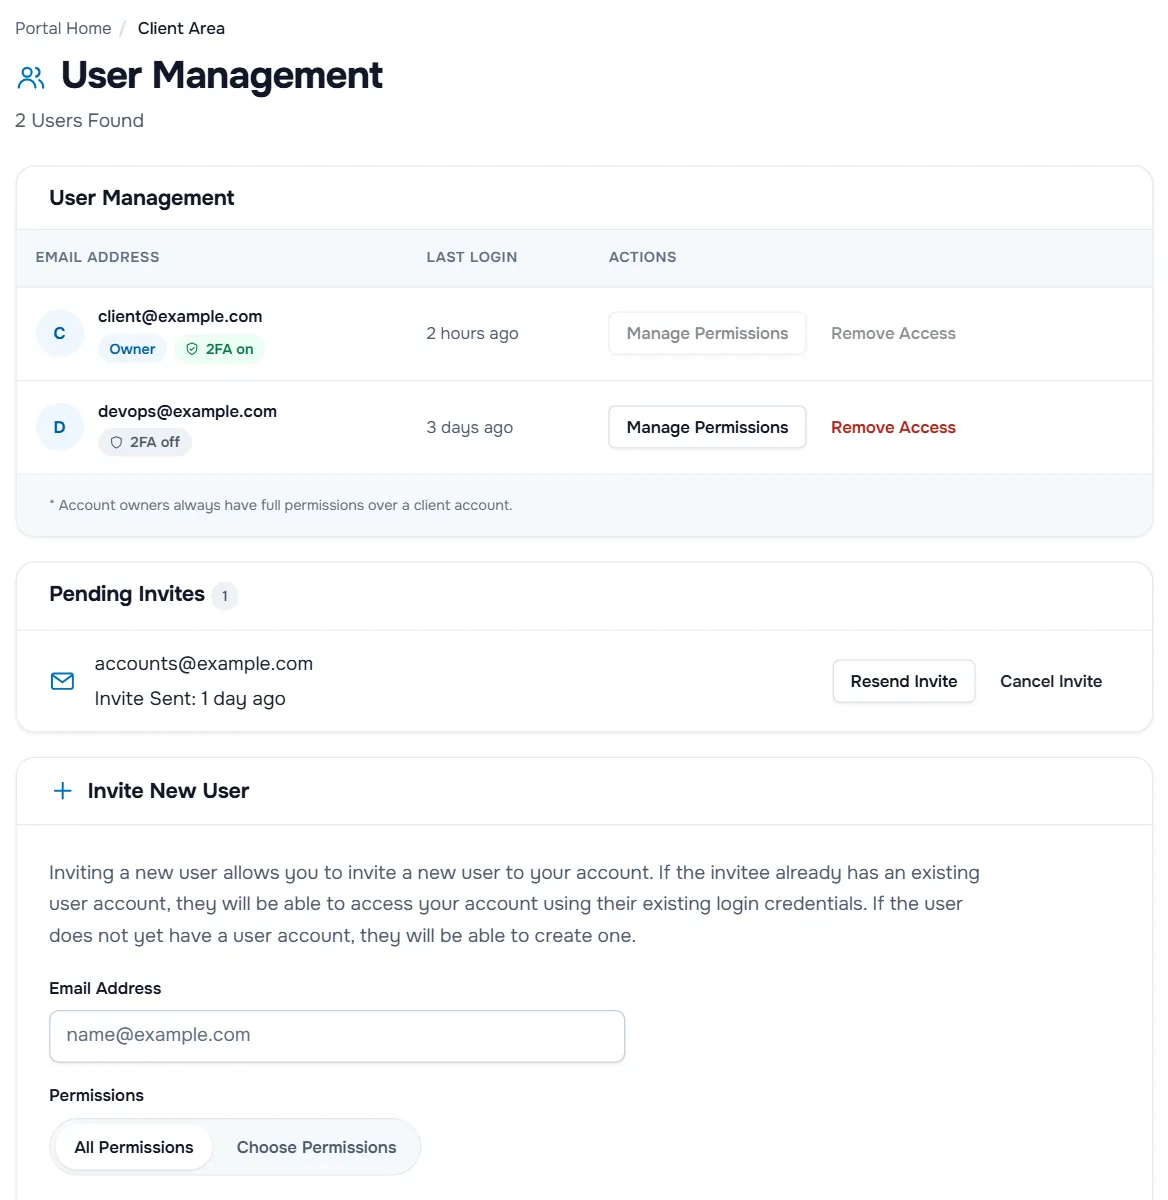
- Owner marks the account owner. As the note under the list says, "Account owners always have full permissions over a client account." Their buttons are disabled.
- 2FA on or 2FA off shows whether the user protects their login with two-factor authentication.
- Manage Permissions and Remove Access change a user's access.
- Pending Invites lists invitations that were not accepted yet.
Step 2: Invite a user
In Invite New User:
- Enter the person's Email Address.
- Under Permissions, choose All Permissions, or Choose Permissions and tick only what they need (see Step 3).
- Select Send Invite.
Verify: the page shows "Invite sent successfully!" and the address appears under Pending Invites with the time the invite was sent.
The person receives an email with a link. If they already have a login, they accept with it; otherwise they register a new login on the invite page, see switch between client accounts. Once they accept, they appear in the user list.
In Pending Invites, Resend Invite sends the email again, and Cancel Invite withdraws it; the person is not notified of a cancellation.
Step 3: Choose the right permissions
| Permission | What the user can do |
|---|---|
| Modify Master Account Profile | Change Account Details: name, company, address and billing settings of the client account |
| View & Manage Contacts | Add, edit and delete contacts |
| View Products & Services | See services and their addons |
| View & Modify Product Passwords | Reset service passwords and use the other service actions |
| Perform Single Sign-On | Sign in to services directly from the client area, for example a control panel |
| View Domains | See domain registrations |
| Manage Domain Settings | Change nameservers, contact details and transfer settings of domains |
| View & Pay Invoices | See and pay invoices |
| View & Open Support Tickets | Open, answer and manage support tickets |
| View Emails | Read the account's Email History |
| Place New Orders/Upgrades/Cancellations | Order new services, upgrade and request cancellations |
If your client area offers quotes, View & Accept Quotes appears in the list as well.
Step 4: Change a user's permissions
- Select Manage Permissions next to the user. The page says "Choose what this user can see and change in your account."
- Tick or untick permissions. At least one must stay ticked.
- Select Save Changes, or Cancel Changes to go back without saving. User Management at the top right also returns to the list.
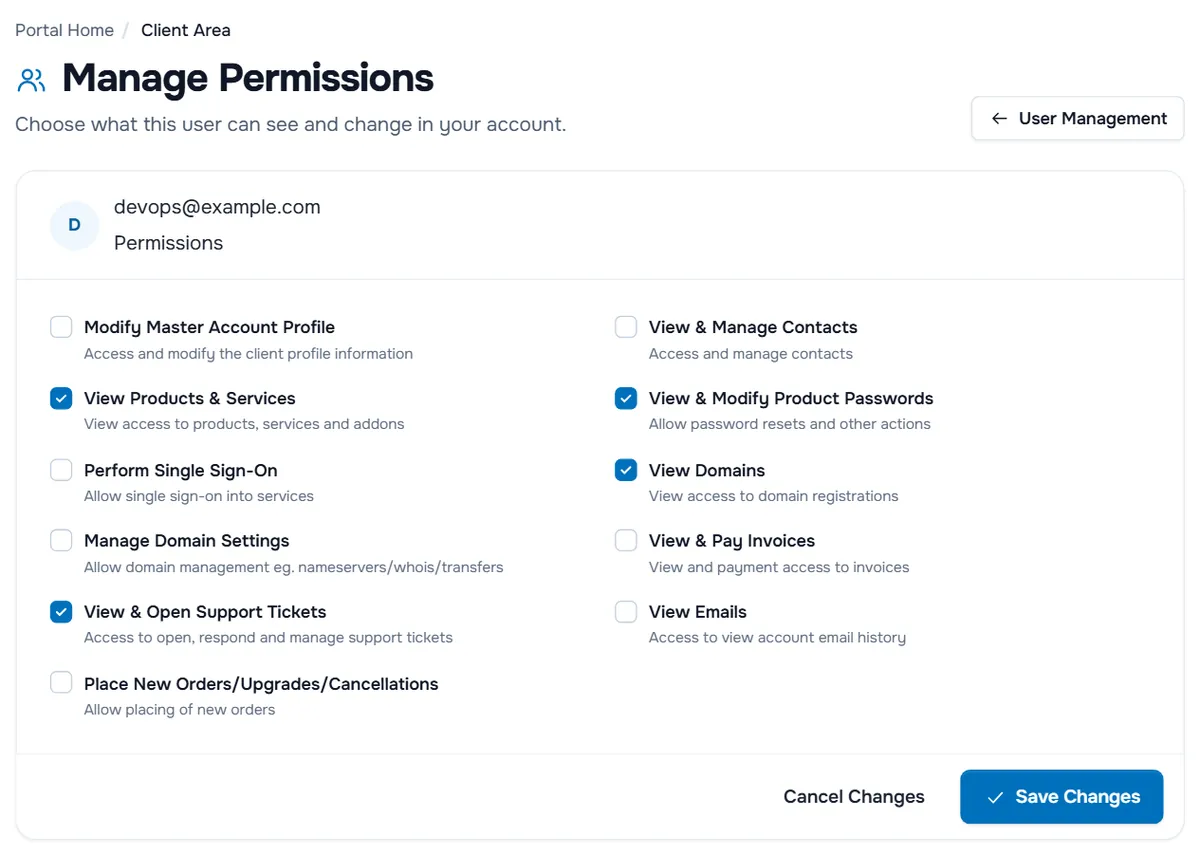
Verify: the page shows "Permissions updated successfully!".
Step 5: Remove a user's access
Select Remove Access next to the user and confirm "Are you sure you wish to remove this users access?". "They will no longer be able to access or administer this account." Their login stays valid for other client accounts they belong to.
When someone leaves, also change the server passwords, SSH keys and API keys they knew, and delete them as a contact if they were one.
Good practice
- One login per person and two-factor authentication for everyone; check the 2FA on badges, see two-factor authentication.
- Review User Management regularly and remove people who no longer need access.
- Keep the owner login safe. The owner always has full permissions; use it for account administration and give day-to-day work its own users.
Troubleshooting
"The email address you entered already has an active invitation." Use Resend Invite under Pending Invites instead of a new invite.
"The email address entered is already a user of this account" The person already has access. Use Manage Permissions to change what they can do.
"Choose at least 1 permission." With Choose Permissions, tick at least one permission before you send the invite or save.
The invitation email does not arrive. Ask the person to check their spam folder, check the spelling of the address, then use Resend Invite.
A user cannot see a page or menu item. They lack the permission for it. Add it with Manage Permissions.
Next steps
Frequently asked questions
What is the difference between a user and a contact?
A user signs in to the client area with their own email address and password and does what their permissions allow. A contact cannot sign in; it only receives the emails you select. Contacts are managed under Contacts.
Does an invited user see my password or payment details?
No. Each user has their own login. What they can see and do depends on the permissions you choose, for example viewing and paying invoices or opening tickets.
Can one person access several client accounts?
Yes. A user invited to more than one account signs in once and switches between the accounts. Permissions are set separately in each account.
Who is the account owner?
The login that created the client account. The owner always has full permissions, which cannot be limited or removed in User Management. To change the owner, open a support ticket.
How do I remove someone who left the company?
Select Remove Access for that user in User Management. Also change any server passwords or keys they knew, and delete them as a contact if they were one.